Research Summary Report C06
Integration of Additive Manufacturing in the Construction Process
[29.04.2022]
Gerke, Markus; Project leader
Maboudi, Mehdi; Associated scientist
Riedel, Björn; Associated scientist
In order to ensure a robust process is followed and the printed object adheres faithfully to the designed model, continuous and automatic data capturing and inspection of the process is required. As a result, quality control would ensure the original vision of the designer comes to light and that the combination of components into objects actually would work.
Summary
Digital fabrication is a design and manufacturing workflow where digital data directly drives manufacturing equipment to form various part of geometries on demands using digital data.
Quality control (QC) is essential for the entire process because it assures the efficiency and robustness in the production. Traditional quality control in construction relies heavily on highly skilled workers, and demands considerable time and money. However, AMC requires an automated and continuous QC to ensure that tolerances are maintained and the realisation of a digital twin which holds the actual geometry is fulfilled. QC is generally categorized from the methodology perspective as follows: i) direct comparison with the as-designed model, and ii) comparison of the corresponding features between the as-is object with their correspondences in the as-designed model such as the quality of edges or maintained distances.
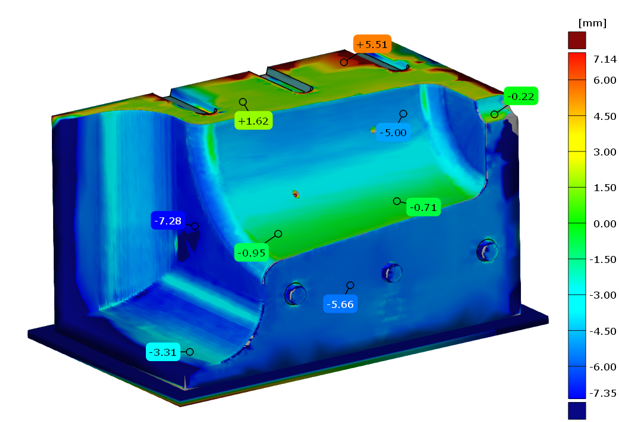
Computing the deviation between the printed object and its digital twin (see Fig.1) requires the two models to be co-registered accurately. However, utilizing a direct comparison between two datasets during the printing process is useful to obtain the deviation information between the current state of the printed object and its digital model. This is important due to the fact that the object has a rough shape and no clean edges are formed yet. This is seen clearly for additive manufacturing using the shotcrete printing method before the surface smoothing and edge trimming step. To this end, in order to proceed for a direct comparison, the problem of robust and accurate co-registration of the printed object, reflected in this case in a laser-scanning-based point-cloud, with its digital twin model needs to be solved first. We utilize a fully automatic co-registration of a TLS-based point-cloud to the model space (TLS: Terrestrial Laser scanner). In order to enable the scanner to acquire data on all parts of the printed object with proper geometry, as well as having an automated data capturing, the scanner was mounted on a robot which is also used during object production.
Current state of research
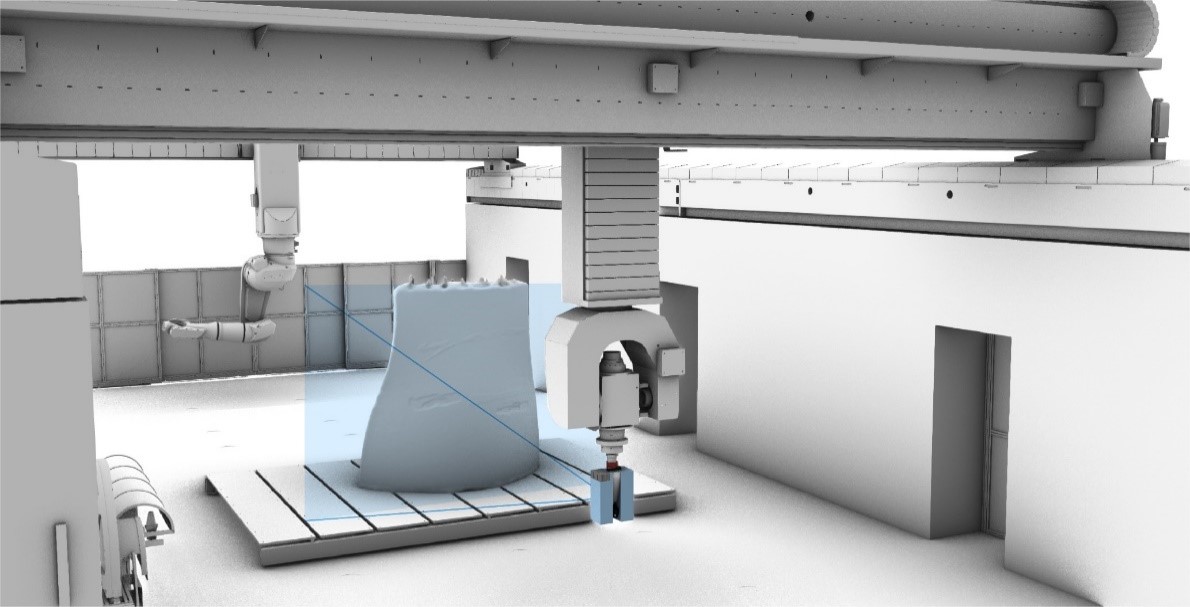
For automatic data capturing, in the case of mounting the TLS on the robot (see Fig. 2), the position of the TLS can be obtained from the robot position. Nevertheless, in order to bring the scanner to the robot coordinate systems, the orientation of the scanner is still missing. Since we used an Z+F IMAGER 5010X which comes with fixed zero-direction of the azimuth angle, it would be sufficient to compute the azimuth angle just once. We verified this property before starting our experiments. As a result, we need to solve the translation between the scanner and the model coordinate system only.
A variety of direct comparison algorithms were conducted to investigate and verify the characteristic of the used algorithms namely: Cloud-to-Cloud (C2C), Cloud-to-Mesh(C2M), and the Multiscale Model to Model Cloud Comparison(M3C2). In addition, the analysis would help to reveal the superiority of the direct co-registration in comparison with other co-registration strategies.


