Research Summary Report of A06
Laser Powder-Bed Fusion (LPBF) of Steel Elements for Construction – Basics of Design and Mechanical Resilience
[27.01.2023]
Wenzler, David; doctoral researcher; david.wenzler@tum.de
Technical University of Munich, Institute for Machine Tools and Industrial Management
Diller, Johannes; doctoral researcher; johannes.diller@tum.de
Siebert, Dorina; doctoral researcher; dorina.siebert@tum.de
Technical University of Munich, Chair of Metal Structures
Summary
The project A06 aims to explore and evaluate the factors influencing the manufacturing of safe and durable structural steel elements by laser powder-bed fusion (LPBF). Thereby, the LPBF process, the post-treatment, and the influence of the part geometry on the microstructure and the mechanical properties will be investigated. From the results, correlations between these aspects will be determined. In the 1st funding period, the project focuses on analyzing small-scale specimens and complex facade elements with multi-axial stress states. Based on the results, a first methodology for a qualified design of safe and durable structural steel elements by means of additive manufacturing will be derived.
Current state of research
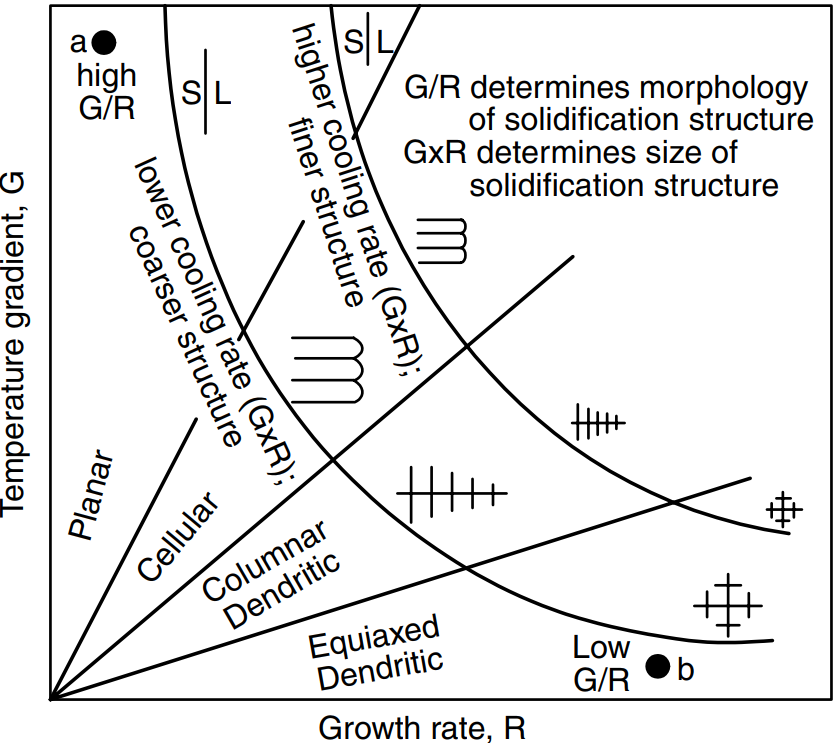
Knowledge of the part characteristics is indispensable for safety-relevant applications, such as in the construction industry. In the LPBF process, the rapid solidification of the small melt pools leads to high cooling rates. The solidification cooling rate influences the resulting microstructure and the mechanical properties of a part. The cooling rate can be defined as the product of the temperature gradient (G) and the growth rate (R) of the liquid-solid interface. A higher cooling rate (GxR) results in a finer microstructure (see Fig. 1). Measuring these rates during the process allows drawing conclusions about the properties of the part. In a recent work of the A06 project, a novel methodology for the thermographic cooling rate measurement during LPBF was developed and tested.
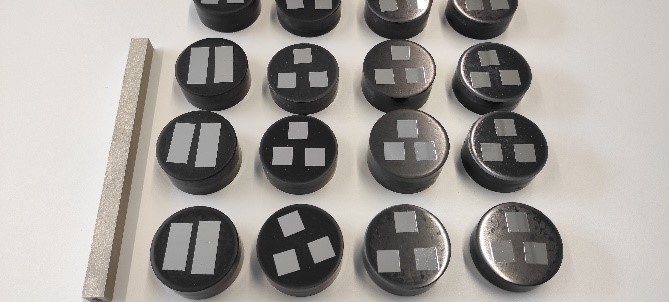
The manufacturing of cuboid specimens was monitored using a high-speed thermographic camera. With the five-step methodology, the cooling rates were evaluated for several layers along the build height. After the manufacturing, the specimens were sectioned longitudinal and transversal, embedded, and polished to measure the microhardness profile (HV 1) along the build height (see Fig. 2). The cooling rates were correlated to the hardness using a Hall-Petch type relationship.
For further information and details on the results, the reader is referred to the open-access article [3].

Fig 1: Effect of the solidification kinetics on the size and morphology of the microstructure; temperature gradient (G), growth rate (R), cooling rate (GxR), adapted from [2]

Fig 2: As-built tower-like specimen (left) and the embedded cross-sections (right) for the hardness measurements
Hot tensile test of a 316L specimen at 850 °C inside the argon filled chamber of the Gleeble 3800-GTC


