Research Summary Report A07
Wire and Arc Additive Manufacturing (WAAM) of complex individualized steel components
[20.05.2022]
Jahns, Hendrik; Doctoral researcher
Unglaub, Julian, Senior researcher
Institute of Steel Structures, Technische Universität Braunschweig
In project A07 the design, manufacturing and mechanical performence of complex individualized WAAM steel nodes for use in construction is investigated. A new method is developed to design force flow optimized steel nodes as connectors between semi-finished parts and anchorage structures considering the manufacturing possibilities of the WAAM-process and the resulting material behaviour. The manufacturing possibilities will be identified by case study demonstrators, which represent occurring features of the designed node. The produced parts are characterized regarding their mechanical properties. For that an advanced material testing method was developed to evaluate the potentially anisotropic material behaviour. With buckling tests on case study demonstrators the component behaviour will be investigated.
Summary
An objective of the research project is to establish a digital twin for WAAM components that can be used for certification. This structure is already being used within the project and the capabilities of the digital twin are being further developed in order to answer research questions.
The effect of special manufacturing points on the mechanical properties and surface quality of thin-walled WAAM components was investigated. These manufacturing points are overhangs, startpoints, interfaces of walls and print pauses. “As-built” and machined dog-bone tension specimens are extracted from walls printed with one of the aforementioned manufacturing points. The surface of “as-built” specimens is measured with a structured light scanner. The geometric data is used to quantify geometric irregularities of the special manufacturing points in comparison to a regular wall. The specimens are tested afterwards in a tensile test, which is aided by an optical measurement: a two to four camera DIC-system is used to measure the full field deformation behavior of the specimens. Currently the data from the 3D-scan, the DIC-measurement, the tensile test data and manufacturing monitoring data is added to a digital twin. The data will be used to correlate possible anisotropies and surface irregularitiers with the special manufacturing points and to characterize their influence on the mechanical properties of thin-walled WAAM-components.
Current state of research
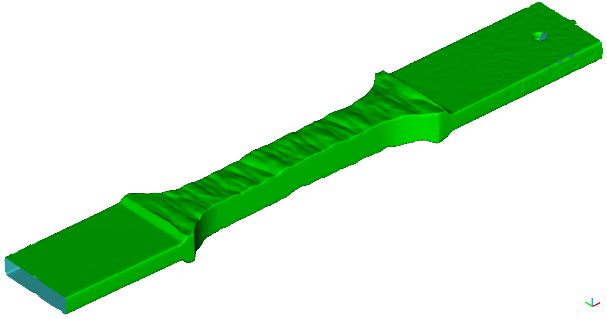
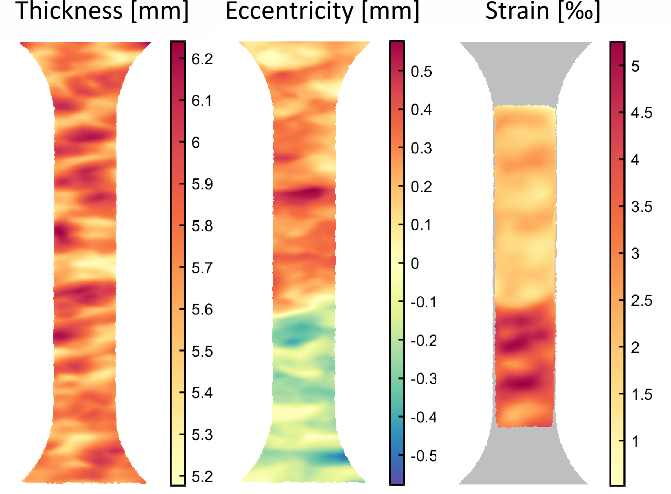
First tests on “as-built” specimens with a print pause were carried out. The 3D-measurement (see Fig. 1) and the DIC-measurement were matched and compared. The thickness and eccentricity (distance of the middle surface in relation to the tension plane) were calculated (see Fig. 2).
The structured light scan revealed an offset between the two sections of the print. The thickness of the specimens had the same statistical distribution on both sections.
The strain fields show a strain concentration near the point, were the offset occurs (see Fig. 2). This can be expected because of the negative eccentricity in this area. The crack is initiated in the same area, although it does not have the minimal thickness and cross-sectional area.
In the next month more tensile tests on “as-built” specimens are scheduled.


